How secure is Windows RDP?
By default, a Remote Desktop session is operated via an encrypted channel which prevents anyone to view your session by network listening methods. Although this is a secure method, it is still susceptible to “man-in-the-middle-attack” to a certain degree as well as a form of brute-force attacks or simple guesses if the attacker has any info on your general likes, preferences and habits (Social media is fun indeed).
Basic security tips
Keep your Windows updated
Remember those annoying updates notifications ? They do come in very useful to ensure the security and stability of your operation system (among other things). The software used for RDP benefits from security updates from the developers on a constant basis, due to its crucial importance. If you’re using older Windows variants, consider switching to a newer one and that the update system is up an running.
Use strong passwords
This is a general tip as using plain words are much easier to crack or guess. The best option here would be using a password of minimum 10 characters, lowercase and uppercase, a symbol and a number. Something like “Th1s1sMyP@$$WorD” is fairly complex and rather secure as long as you do not store it in plain text or write it down somewhere in an unsafe place. Consider using Keepass , it’s a very useful tool with both linux, windows and android/iOS clients.
Check firewall configuration
By default, Windows has a fairly reliable firewall and easily configurable but some features are not required for workstation use such as file sharing rules , printer sharing or other non-used network features. It very much depends on what you are using it for.
An extra layer of security would be adding an IP range lock. Basically , this locks the RDP server to listen only to IPs specified in the desired IP range. This is a double-sided sword and use only if you are certain your IP address is fixed and does not change randomly like a dynamic one OR you have a VPS set as a connection gateway or vpn used solely to connect to your RDP. A bit overkill but there are even more intricate ways than this. The IP lock can be added at Windows Firewall > New Rule > Scope feature where the IP range can be defined.
Change RDP port
It is commonly known that Windows Remote Desktop port is 3389 and thus attacks are generally targeted at this port. A common practice would be to change it to a random free port and add the change to the firewall. Make sure you don’t get locked out during the process.
- Connect to the server via RDP
- Go to Windows Firewall > Advanced Settings > Inbound > New Rule > Port > TCP > Insert desired port here > Give it a name.
- Click on Start > Run > regedit
- Search for this subkey : HKEY_LOCAL_MACHINE\System\CurrentControlSet\Control\TerminalServer\WinStations\RDP-Tcp\PortNumber
- Double-click on “PortNumber” > Select Decimal base > Type the port number > Press Ok
- Exit regedit
- Restart server
- Pray you have set the correct firewall rule or port and your provider offers VNC or KVM/IPMI access just in case.
Set a lockout policy
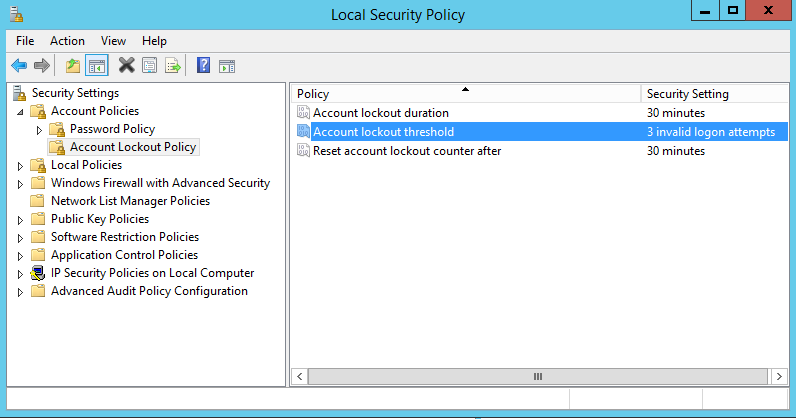
Further improving RDP security, Windows does offer the option to lockout RDP login for a certain period of time, after a certain number of incorrect guesses. This option is turned on by default but can be easily enabled.
- Go to Start > Programs > Administrative Tools > Local Security Policy
- At Account Policies > Account Lockout Policies > Account lockout threshold > Set this value to 3 > Confirm the next prompt of 30 minutes each (can be changed afterwards)
- Press Ok > Close Local Security Policy
- Restart the server.

Enhance the encryption level with TLS
Another useful little trick is the RDP session encryption level and force TLS (Transport Layer Security) implementation.
TLS implementation:
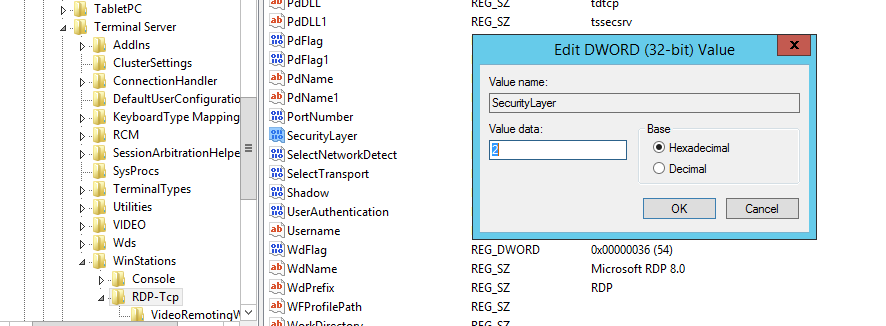
- Click on Start > Run > regedit
- Go to HKEY_LOCAL_MACHINE\System\CurrentControlSet\Control\Terminal Server\WinStations\RDP-Tcp\SecurityLayer
- Set the value to 2
Security levels description:
- Security Layer 0 – With a low security level, the remote desktop protocol is used by the client for authentication prior to a remote desktop connection being established. Use this setting if you are working in an isolated environment.
- Security Layer 1 – With a medium security level, the server and client negotiate the method for authentication prior to a Remote Desktop connection being established. As this is the default value, use this setting only if all your machines are running Windows.
- Security Layer 2- With a high security level, Transport Layer Security, better knows as TLS is used by the server and client for authentication prior to a remote desktop connection being established.

Encryption level:
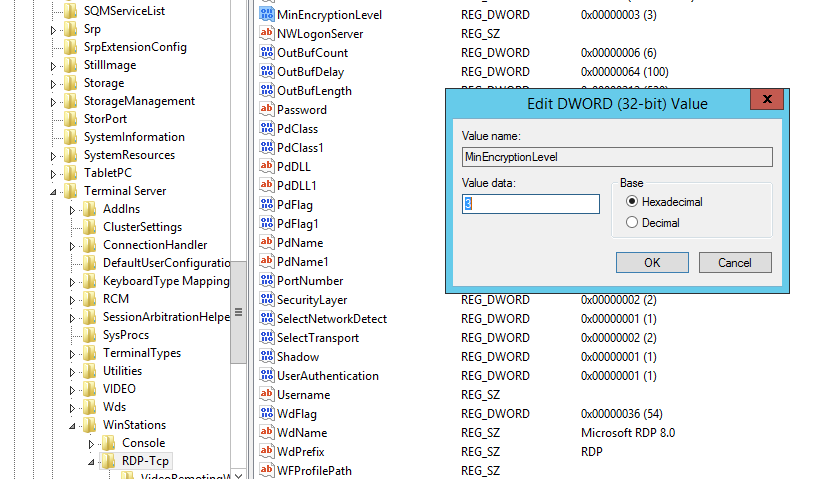
- Go to HKEY_LOCAL_MACHINE\System\CurrentControlSet\Control\Terminal Server\WinStations\RDP-Tcp\MinEncryptionLevel
- Set the value to 3. You can set value to 4 but only if both machines support this type of encryption.
Security levels description:
- Security Layer 1 – With a low security level, communications sent from the client to the server are encrypted using 56-bit encryption. Data sent from the server to the client is not encrypted. This setting is not recommended as you can be exposed to various attacks.
- Security Layer 2 – Having a client compatible security level, communications between the server and the client are encrypted at the maximum key strength supported by the client. Use this level when the Terminal Server is running in an environment containing mixed or legacy clients as this is the default setting on your OS.
- Security Layer 3 – With a high security level, communications between server and client are encrypted using 128-bit encryption. Use this level when the clients that access the Terminal Server also support 128-bit encryption. If this option is set, clients that do not support 128-bit encryption will not be able to connect.
- Security Layer 4 – This security level is FIPS-Compliant, meaning that all communication between the server and client are encrypted and decrypted with the Federal Information Processing Standard (FIPS) encryption algorithms. Use this setting for maximum security but only if both machines support this type of encryption.

On a final note
There are other more complex methods as well but for the average user , these should be more than enough. How far you want to go , is up to you.
Enjoy!
